空間作成メモ
読んでみて何かあれば、splume内でクリエル(メール)送って下さい。「A」というHUBです。
| 参 考 元 |
◆開発者blogの空間作成カテゴリ ◆開発情報リファレンス ◆splumeでの空間製作 (ROGMAさん) |
◆メタセコイアの本 ※スプリューム内では1番が人気 1.メタセコイアからはじめよう!―無料で作る3Dキャラクター 2.メタセコイア・マスターガイド―Metasequoiaからつくる3DCG 3.Metasequoia―3D CG メタセコイア入門 |
| 準 備 |
◆Metasequoia(メタセコイア) ◆Metasequoiaダウンロードページ ◆MTSQ_DX2CR (splumeで用意したコンバート用ツール) |
|
| 目次 | |||||
| メタセコ | コンバート | crファイルの説明 | 空間名をつける | 背景色をつける | BGMをつける |
| コリジョン (当り判定) をつける |
crファイルを 組み合せる |
霧をかける | 歩き判定を つける |
アンカー | 勉強中 |
| 1. | メタセコイアのフリー版を ダウンロードページから ダウンロードしてインストールする。 |
|
||
| 2. | インストール後、メタセコを起動し、 「ヘルプ」を開いて「チュートリアル」を確認し、 使い方を大雑把に把握する。 |
|||
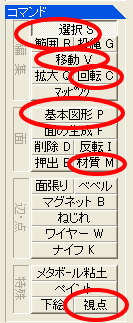
| 3. | 大体の雰囲気をつかんだら、 床になる平面に気をつけつつ 「基本図形」を駆使して3Dを作成。 ※Metasequoia(メタセコイア)の使い方を作成しました。 大雑把な説明ですが、参考にしてみて下さい。 その他参考になるサイトなどは↓ ・mixi内のメタセココミュ ・メタセコ普及委員会 ・bazooka ・Msp Lab. ・メタセコイアUV解説 (Pallete) ・hakka64G ・KINOWORKS |
|||
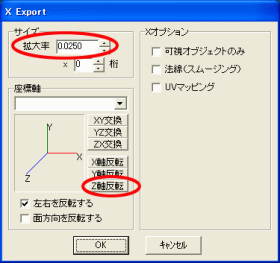
| 4. | 出来上がったら、一度、 ファイルを通常形式のmpq形式で保存します。 ※後で修正しやすいようにするためです。 次に、ファイルの種類で 「Direct3D Retained Mode(*.x)」を選び、 x形式で保存します。 保存時は、「拡大率」を 0.0100から適度なサイズに変更※し、 「座標軸」グループの[Z軸反転]ボタンをクリック してから保存してください。 ※「拡大率」は、0.02〜0.03ぐらいの間で 指定するといいかも。 |
 |
| 1. | まず、Cドライブに「crscript」というフォルダを作成します。 ここに変換logファイルや設定ファイルを作るので、 Cドライブに「crscript」フォルダがないと、コンバートツールが正常に動きません。 あとで管理しやすい用にxファイル用のフォルダを作ります。たとえばDドライブに、「cr」とか。 特に管理用フォルダがいらなければ、Cドライブの「crscript」フォルダをxファイル置き場にしても良いです。 ここでは、「cr」フォルダで話を進めます。 |
|
| 2. | メタセコで保存したxファイルを「cr」フォルダに コピーしておく。 ※ホームページ作成と一緒で、日本語のファイル名は使用できません。 半角英数字でファイル名をつけましょう。 |
|
| 3. | コンバートツールをダウンロードして解凍する。 【ダウンロードはこちら】 保存場所、解凍場所は、 「cr」フォルダである必要はない。 |
 |
| 4. | 解凍後は、setup.exeを起動する。 インストールが始まりそうですが コンバートツールが起動します。 |
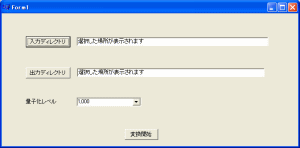 |
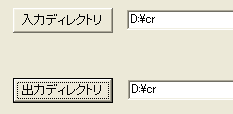
| 5. | 入力ディレクトリボタンを押し、「cr」フォルダを指定します。 すると、出力ディレクトリも、同じフォルダが指定されます。 よければ、「変換開始」ボタン。 ※量子化レベルは10〜100000の範囲で指定でき、 値が大きいほどキレイでファイルサイズも膨らむ。 |
 |
| 6. | 変換後は、「cr」フォルダ内にcrファイルが出来ているはず。 ここまでで、ほぼ完成。 CRbrowserを起動してログインし、 CRbrowserにcrファイルをドラッグして確認。 ※先にログインしてないと、HUBが表示されません。 また、コリジョン(当たり判定)が設定されてないので、 オブジェクトをすり抜けてしまいます。 |
|
| 7. | 確認して問題なければ、 どっかのフリーホームページを利用し、 crファイルをアップロードして、 実際にアクセスしてみましょう。 |
※Geocitiesでは、 以前は、crファイルを扱えませんでしたが、 現在は、crファイルの利用が可能になっています。 |
メモ帳とかのテキストエディタで開くと下記のようになっています。
マウスポインタを置くと、ちょっとした説明を表示します。
クリックすると、公式サイトの説明へ飛びます。
NavigationInfo { headlight FALSE type "ANY" wallTrace TRUE collisionDetection "BOUND" speed 2 }
Viewpoint { position 0 1 5 fieldOfView 1.275 }
DEF avatarLayer Transform { children [] }
Background { skyColor 0 0 0 }
PointLight { ambientIntensity 0.3 color 1.0 1.0 1.0 intensity 0.0 }
DirectionalLight { color 1.0 1.0 1.0 direction 0.0 -0.6 -0.8 intensity 0.6 }
DirectionalLight { color 1.0 1.0 1.0 direction -0.7 -0.6 0.4 intensity 0.6 }
DirectionalLight { color 1.0 1.0 1.0 direction 0.7 -0.6 0.4 intensity 0.6 }
DirectionalLight { color 1.0 1.0 1.0 direction 0.0 1.0 0.0 intensity 0.5 }
コンバートツールで変換しただけでは、
Cell情報が何もないので、
Cell情報として空間名、及びサイズを書き加えてあげる。
descriptionで空間名を設定し、
sizeで横 縦 奥行きを、m(メートル)単位で設定します。
ちなみに、ボックルが約1.6mなので、
そういった値を基準に考えるといいです。
▲目次へ戻る
Cell { description "空間名" size 60 30 60 }
※「#」をつけた行はコメントアウトされるので、
説明として書いておくと、後で編集しやすいです。
crファイルに書いてある、
BackgroundのskyColorの値を書き換えます。
RGB(赤緑青)で、0〜1の範囲で指定する。
一般的に色は0〜255で指定するので、
127であれば0.5と置き換えればよい。
【Web Safe Color一覧表/カラーチャート】
上記サイトで、RGBの値を参考にし、
Excelや電卓ソフトで値を256で割り算し、
大体の値を計算しましょう。
例)薄い緑
#33cc66 RGB(51,204,102)
→ 51÷256, 204÷256, 102÷256
→ 0.2 0.8 0.4
▲目次へ戻る
※上記の値で水色っぽくなります。
BGMを設定できます。
crファイルと同じフォルダに入れると、
urlの指定が短くて済みます。
使用するファイルに日本語名は使用できません。
半角英数字で。
▲目次へ戻る
AudioClip { description "説明" loop TRUE url "ファイル"}
当り判定をつけます。
まったく通り抜け不可のオブジェクトを作ります。
床にコリジョンをつけると、床に上れなくなりますので、コリジョンをつける場合は、別オブジェクトとしてつくり、別crファイルにして、後記してるInlineで組み込むとわかりやすいです。
んで、右記のように行を書き足したら、下の方で閉めてあげないといけないので、一番下の行のひとつ上の行に、
] }
の閉じ記号を書き足すのを忘れずに。
▲目次へ戻る
Shape { geometry IndexedFaceSet {
と、書いてある行があるので、
下記のように間の行に書き足す。
Transform { children [
#コリジョンの設定
Collision { collide TRUE children [
Shape { geometry IndexedFaceSet {
ski.crやkamakura.crなどには、コリジョンをつけているので、ぶつかるようになってます。
※そのせいで、かまくらに入れないようになってるので、改善策を練り中です。
▲目次へ戻る
Transform { children [
Inline{ url "iedaruma.cr"}
Inline{ url "kamakura.cr"}
Inline{ url "ski.cr"}
] }
右記のような感じで書き加えましょう。
色が白で、距離に比例して霧がかかるようにし、40m先が100%霧がかるように設定してます。
▲目次へ戻る
Fog { color 1 1 1 fogType "LINER" visibilityRange 40}
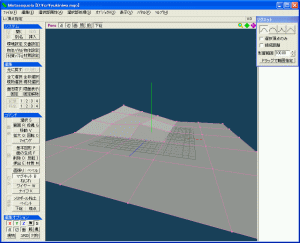
まず、メタセコイアで、
坂になっているものや、山のある
ポリゴン空間を作ります。
右図は、
5×5に分けた平面を、
「マグネット」ツールで
ポコポコ膨らませたものです。
出来た図は、【コンバートツール】を参考に、
コンバートツールでcrファイルに、
変換しておきましょう。
グラウンド名と日本語で書かれている2箇所を、任意のアルファベット名に書き換えます。
そして、数値1と数値2は、元々記述されていた値からコピーします。
PointLight { ambientIntensity 0.3 color 1.0 1.0 1.0 intensity 0.0 }
DirectionalLight { color 1.0 1.0 1.0 direction 0.0 -0.6 -0.8 intensity 0.6 }
DirectionalLight { color 1.0 1.0 1.0 direction -0.7 -0.6 0.4 intensity 0.6 }
DirectionalLight { color 1.0 1.0 1.0 direction 0.7 -0.6 0.4 intensity 0.6 }
DirectionalLight { color 1.0 1.0 1.0 direction 0.0 1.0 0.0 intensity 0.5 }
# 歩き判定設定
Transform { children [ DEF グラウンド名 IndexedFaceSet { coord Coordinate { point [数値1] }
coordIndex [数値2]
}
] }
Transform { children [
Shape { geometry IndexedFaceSet {
coord DEF Point Coordinate { point [数値1] }
texCoord DEF Texpoint TextureCoordinate { point [0 0,] }
} }
Transform { children [
Shape { geometry IndexedFaceSet {
coord USE Point
texCoord USE Texpoint
ccw TRUE convex FALSE solid FALSE creaseAngle 1.562500
coordIndex [数値2]
texCoordIndex [数値3]
}
appearance Appearance {
material Material {
diffuseColor 1.000000 1.000000 1.000000
specularColor 0.000000 0.000000 0.000000
emissiveColor 0.000000 0.000000 0.000000
}}}
] }
] }
# 外部crファイル呼び出し
Transform { children [
Inline{ url "iedaruma.cr"}
Inline{ url "kamakura.cr"}
Inline{ url "ski.cr"}
Inline{ url "hatacr"}
]}
# 空間情報
Cell { description "雪庭" size 65 30 65 indoor FALSE USE_IFS_GROUND グラウンド名 }
最後2行の空間情報に関しては、【空間名をつける】を参考にして下さい。
ただ、外部crファイルに設定しても、なんかうまく動かなかったので、
メインのcrファイルで坂を作って、GROUND設定する必要があるかもです。
▲目次へ戻る
リンクをつけるオブジェクトを別に作っておいて、
メインのcrファイルで、Inlineで記述して組み込んでいます。
アンカーに2種類あります。
・Webページを表示させる
※urlDescriptionとurlを使用します。
・別のcrファイルへ飛ばす
※cellDescriptionとcellUrlを使用します。
右記のようにTransformとShapeの間に入れ、Transformのシメの閉じカッコの前に、閉じカッコを付け加えて閉じます。
つまり、一番下の行の「] }」の上に一個]「 }」を書き足しておきます・
▲目次へ戻る
# Webページを表示する
Anchor {
urlDescription "splume naviを開く"
url "http://splumenavi.iinaa.net"
windowName "connectableReality"
windowSize 700 700
children [
Shape { geometry IndexedFaceSet {
〜〜〜〜〜〜〜
] }
] }
メタセコのUVマッピングについて
